DNS flush command: Clear DNS cache on Windows/Mac/Linux
If you don’t want anyone to track which websites you have visited with the browser, it seems to be enough to delete its entries, such as history or cache. If you want more, then you can also clear the DNS cache. Do you want to flush your computer’s DNS cache? We’ll show you all DNS flush command and why it’s so important.

Your computer’s DNS cache diligently stores data about your Internet activities. It can be worth deleting it regularly because errors in the cache can also lead to problems when retrieving websites. For example, a corrupted DNS cache can generate an HTTP 400 error.
The following steps show how to view and flush DNS on Windows 10 if necessary. To simplify the analysis of the DNS cache, we also reveal how you can save the DNS cache in a text file. For all steps, you need the DNS flush command in Windows 10.
What is DNS flush?
DNS flush is the manual deletion of temporary files in a DNS cache. DNS flush permanently removes all entries stored in the DNS cache. Typically, a DNS flush is performed when there are internet connection problems, a security issue, and other threats. DNS flushing is mainly used to troubleshoot cache poisoning and internet connectivity issues.
What is the DNS cache?
In order for domain names such as www.google.com to be converted into a (numeric) address that the computer can understand, the requests must be routed through a DNS server. The Internet relies on the Domain Name System (DNS), an index of all public websites and their corresponding IP addresses. DNS works much like a phone book, in which each hostname has a unique IP address associated with it. A browser with this IP address can only access a web page.
For this reason, the operating system stores the resolved addresses in a cache, the so-called DNS cache. This means that it has all the information relevant for name resolution (e.g., name and type of record), whereby each of these entries are only valid for a certain period of time, the so-called TTL (time to live).
The TTL can retrieve the information locally from the DNS cache, which makes a new request via the domain’s name server unnecessary. The processing is thus faster, and the actual name server is relieved.
How does the DNS cache work?
When a person types something into the browser’s address line, e.g., www.wiredale.com, then the operating system, browser, and router need the so-called name resolution. Which is done via the DNS (Domain Name System).
In simple terms, the URL is passed in plain text to special servers (name servers), which return a numerical IP address (e.g., 92.102.203.89). A DNS cache sometimes referred to as a DNS resolver cache, is a temporary database maintained by a computer’s operating system. When a web address is entered into a browser, the associated IP address must communicate with the server.
If the same URL is requested repeatedly, the browser first looks in the local DNS cache for the IP address of the URL. This means that the entire so-called DNS lookup process does not have to be run through with each call in order to ultimately receive the IP address from a name server. This speeds up the call-up of a website considerably. The DNS cache stores the URL – IP address mappings of all recent visits and attempted visits to websites and other internet domains.
DNS flush command: How to clear the DNS cache?
This section will show you how to flush the DNS cache of your Windows 10, Linux, and macOS computers.
How to clear DNS cache on Windows 10
With this DNS flush command, can clear all the websites visited even after deleting the browser history.
- Press or click on “Start”.
- Type “cmd” using Windows search.
- Click on Command Prompt or press the Enter key.
- Now a window opens for entering command line commands.
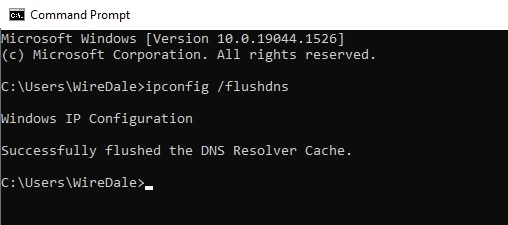
- Enter ipconfig / flushdns here and press Enter.
- This clears the cache, and all saved hostnames are gone.
Note for Vista users: You must start the command line as an administrator. Otherwise, Windows will refuse the deletion process. With Windows 7/8/10, on the other hand, it works with a simple command line.
Show DNS cache, even deleted browser history
To see for yourself what information the cache has stored on your PC, then proceed as follows:
- Press on the “Start”.
- Type “cmd” on search and press the Enter.
- Enter the command ipconfig /displaydns
- And press Enter.
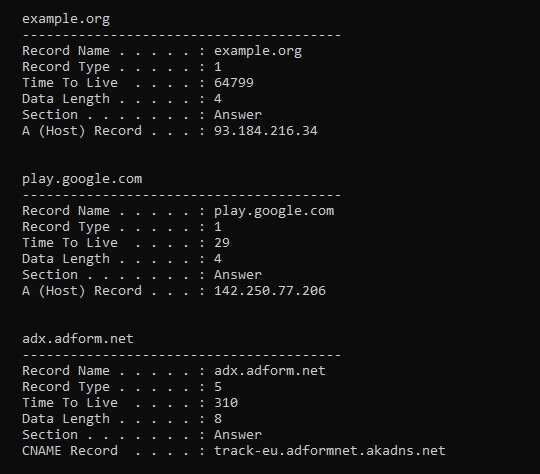
- A list of the cached DNS information on your PC then appears.
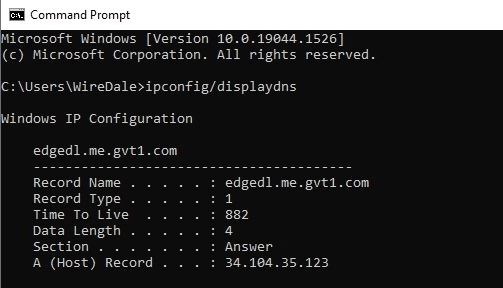
You will find many domain names here that you have visited recently. You won’t find the complete address here, but some domain names are critical enough.
Saving the DNS cache in Windows 10 as a text file
If you want to examine the list in more detail, the command line is not suitable. It is better to save the information in a text file.
To do this, enter the following in the command line window:
ipconfig /displaydns > %homepath%\Desktop\cache.txt
This created the file “cache.txt,” which you can now display by double-clicking in the text editor.
Resetting DNS cache on the Mac
Unlike Windows operating systems, the Mac has a separate command for flushing the DNS cache for each version. Call Terminal from the Applications -> Utilities folder and enter the following commands for each edition:
macOS 10.12.0 (Sierra):
sudo killall -HUP mDNSResponder
OS X 10.10.4 (Yosemite) and 10.11.0 (El Capitan):
sudo dscacheutil -flushcache;
sudo killall -HUP mDNSResponder
On OS X 10.10.1 through 10.10.3 (Yosemite):
sudo discoveryutil mdnsflushcache
sudo discoveryutil udnsflushcaches
OS X 10.9.0 (Mavericks):
sudo dscacheutil -flushcache;
sudo killall -HUP mDNSResponder.
DNS flush command on Linux
Linux systems do not have a standard DNS cache but use applications like nscd, pdnsd, or dnsmasq to cache the information locally. To reset the DNS cache, you must take the detour via the command line. Also, note that the operation requires administrator privileges.
You can clear the DNS cache of pdsnd with this DNS flush command.
sudo pdnsd-ctl empty-cache
For all others, you need to restart the service, for example
sudo /etc/init.d/dnsmasq restart
or
sudo /etc/init.d/nscd restart
Why should you regularly flush the DNS cache?
The stored information remains in the cache until the TTL expires or is manually flushed, and the validity period is thus set to 0.
For security reasons, you should do it regularly because if hackers gain access to the DNS cache, they can do great damage to the information it contains. This is because the cyber criminals manipulate the entries and gain access to your sensitive data in this way, for example, by redirecting your request to a fake online banking site (DNS spoofing). You can nip such attacks in the bud by clearing DNS flush with this flush command.
Traceability on the Internet is another reason for regularly cleaning the DNS cache. While you primarily collect cookies and use JavaScripts during your trips to the Web, which can provide information about your surfing behavior, it can also use the addresses in the DNS cache and the TTL to determine which pages you have visited (frequently).
Even if you want to test new network configurations, you should flush the DNS cache beforehand, as the cached data could otherwise falsify the result.
Last but not least, a DNS flush can also help fix technical problems in the form of call errors or unreachable addresses. Outdated entries (e.g., an earlier IP address) in the cache can cause an incorrect web page version to be called. The request is forwarded to the responsible name server again by clearing the DNS cache, and the current address information is loaded or used. Note, however, that the provider’s DNS cache must also be up to date, so it can access the domain correctly.
When is DNS flush useful?
The entries in the cache remain stored until the Time To Live expires. In the example above for docs.google.com, that’s 21 days. Anyone who has access to the computer and thus to the DNS cache can use the entries to track which pages the actual user visited and when.
In order to hide the surfing behavior from others, it makes sense to do a DNS flush regularly. Another reason for a regular DNS flush is protection against manipulation. A DNS flush deletes falsified entries and reduces the risk of redirection to sites with criminal intentions.
DNS flush during server migration
A DNS flush can also be helpful for webmasters during server migration. While you can make changes to the DNS server immediately, changes to the cache can take up to 48 hours. During this time, users cannot access the website.
However, when a DNS flush is performed to clear the cache, the DNS server automatically looks for the new IP address. The server cannot rely on the cached address. You can access the correct IP address immediately by flushing the DNS cache.
Why the DNS cache contains sensitive data
DNS is the service that determines the IP address behind a host name like “wiredale.com.” For this purpose, the DNS server responsible for you is queried in each case.
In order to prevent repeated queries from resulting in new accesses to these servers, Windows stores the results in the DNS cache at the operating system level.
This means you cannot find complete web addresses but all server names you have visited recently. That alone can be embarrassing enough.
By the way, the private mode that many browsers have doesn’t help here either because you use all Windows for DNS queries.